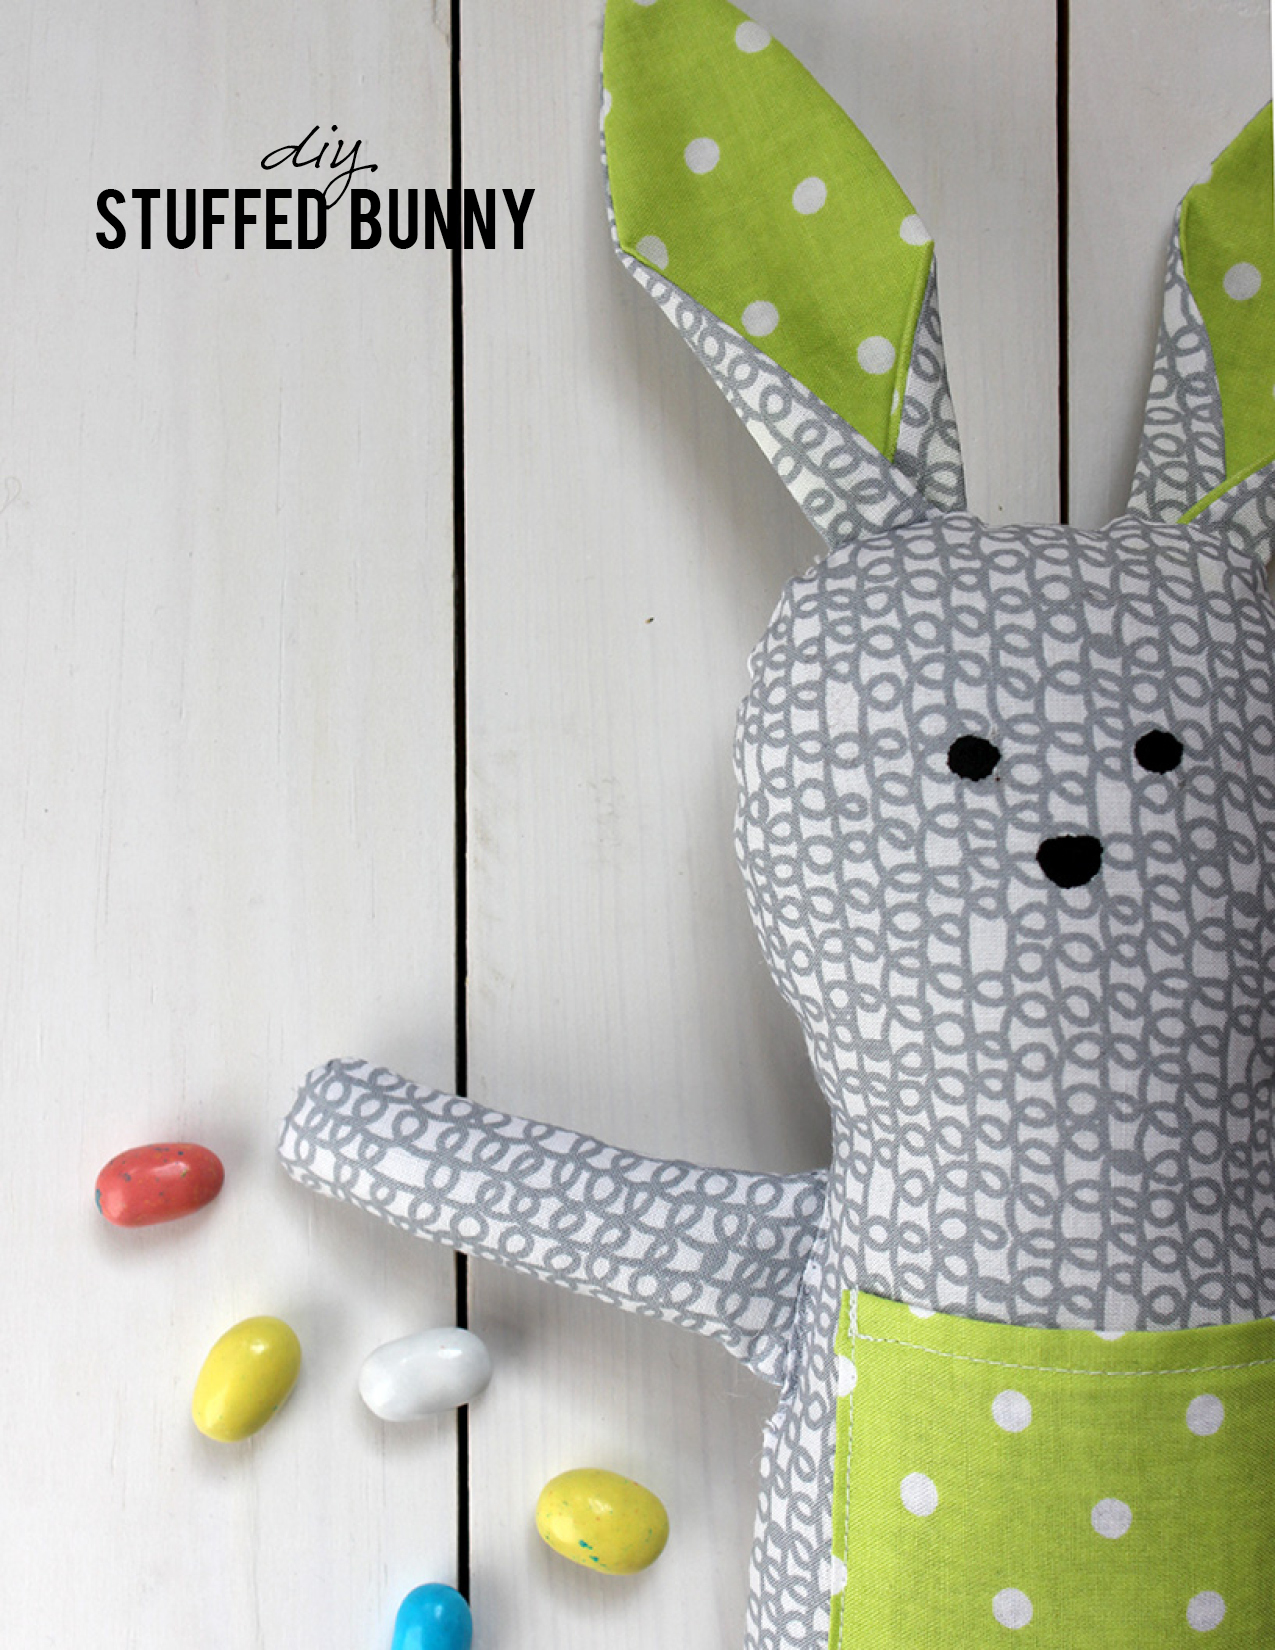
DIY Stuffed Bunny
See how to make this darling DIY Stuffed Bunny for a sweet Easter gift!
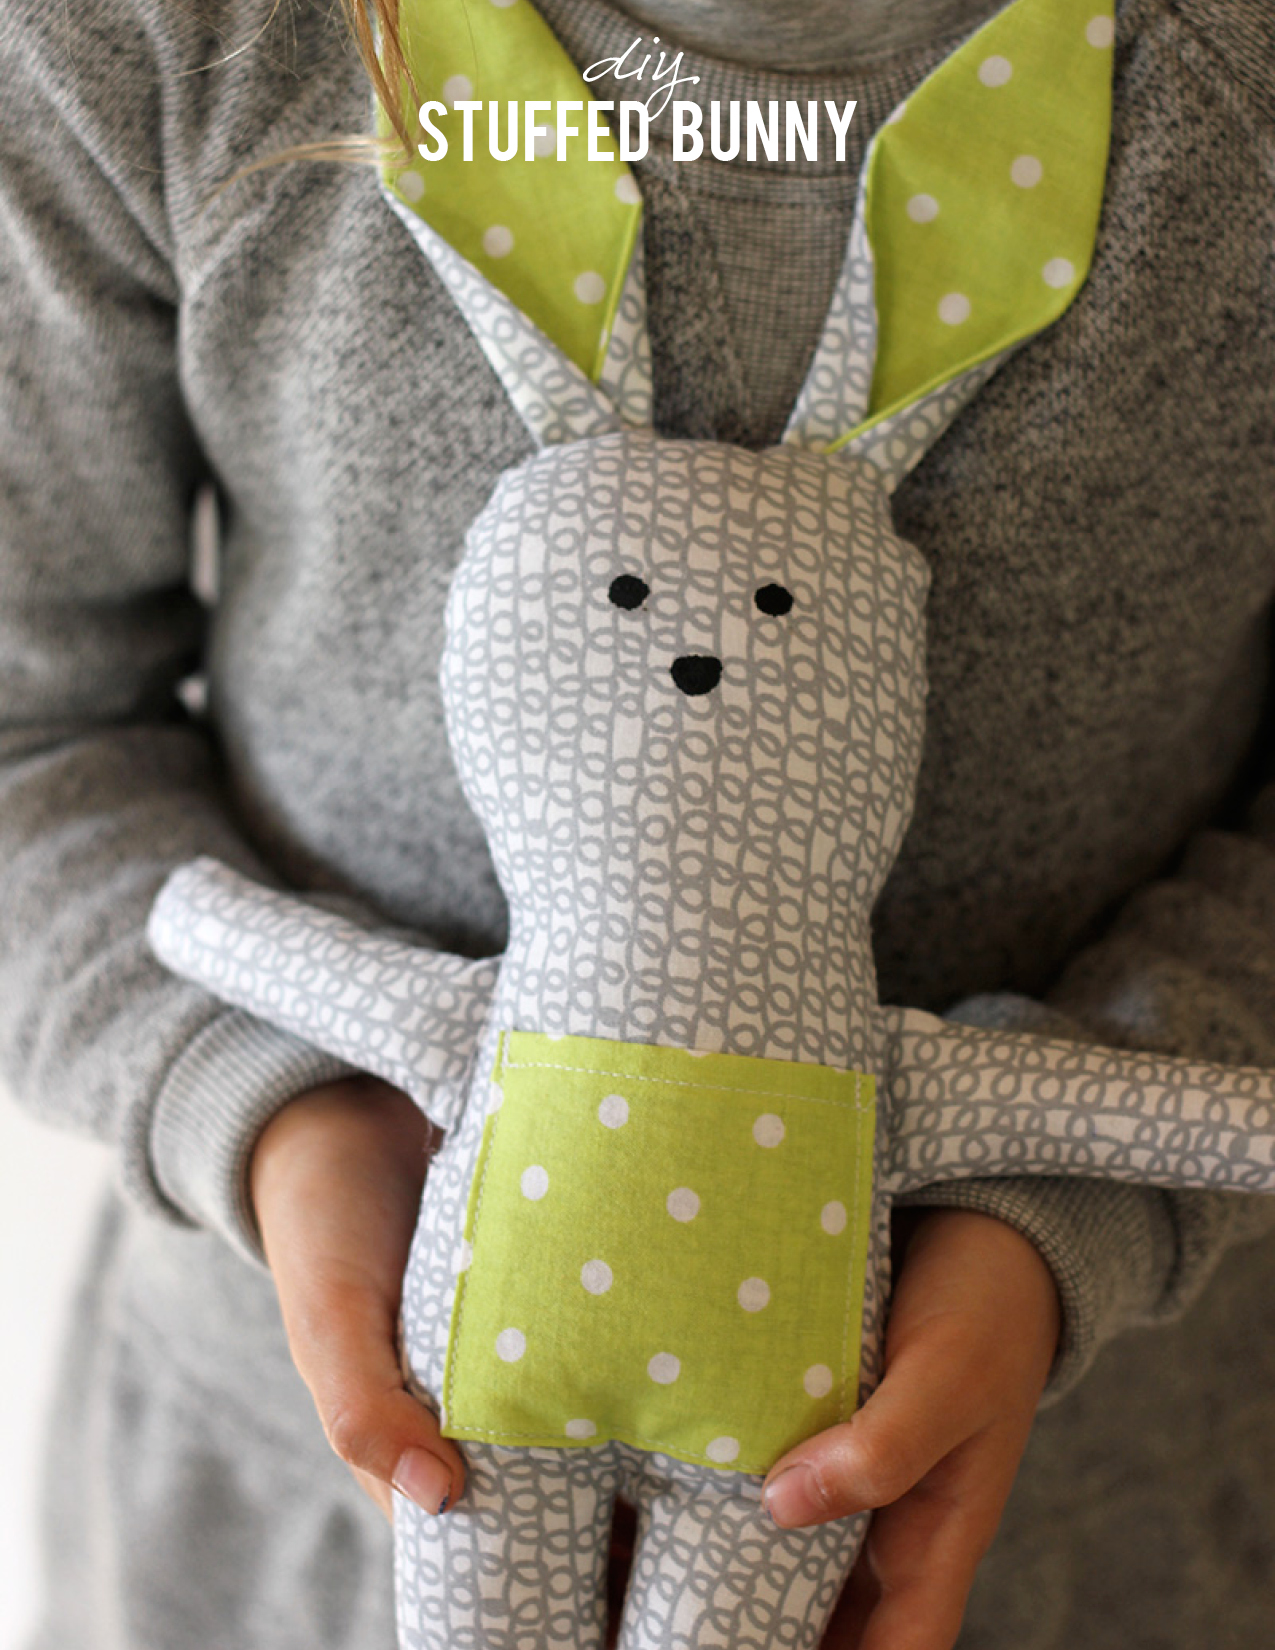 I could not resist making a stuffed bunny for Harper’s Easter basket this year. What could be cuter than a little bunny made from modern designer fabric?!
We love to make handmade gifts for our girls. There is something sentimental and thoughtful about taking the time to make something by hand. Like this darling Handmade Bunny Purse.
I started making my own pattern for the bunny and then stumbled onto Martha Stewart’s stuffed menswear bunny. I printed her pattern but wanted to add a little something to the front to make it special.
I had this amazing gray and white modern fabric that works perfectly for this bunny.

Read more for supplies and tutorial.

DIY Stuffed Bunny Supplies
1/3 yard of fabric for bunny
scrap fabric for bunny ears and pocket
fill (pillow fill from fabric store)
sewing machine
fabric paint (or fabric paint pen)
How to make a DIY Stuffed Bunny
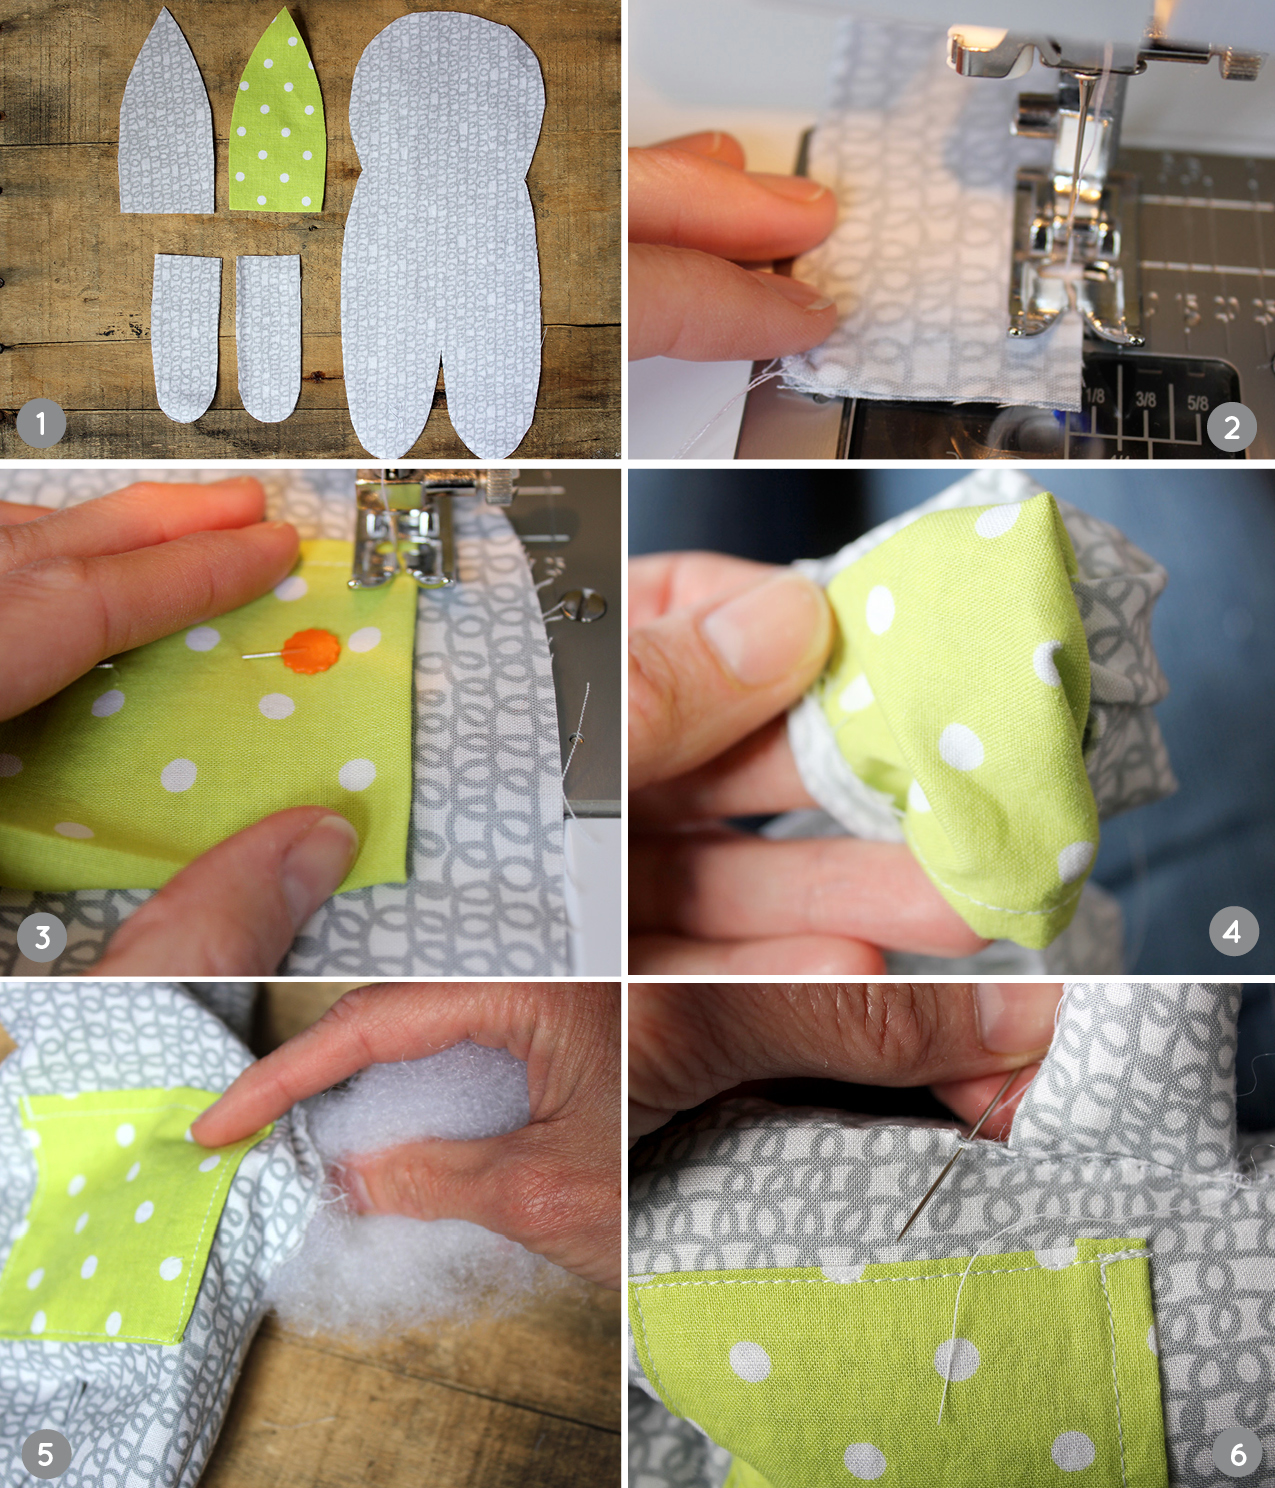
I followed Martha’s tutorial but made a few changes to add a pocket on the front to make it extra special.
Step 1: Print pattern and cut out the pieces from your two fabric choices. I used the gray and white modern pattern for the body and green polka dot for the pocket and ears.
Step 2: Next sew the arms together and stuff. Leave the arm openings open – as you will sew those into the body.
Step 3: Sew the ears together – you will not need to stuff these. And also note, that you will want to sew these with the wrong sides of fabric facing each other.
Step 4: Add the pocket to the center front of the body fabric. Then sew the body together with the right sides of fabric facing each other. I like to use an 1/4 inch allowance. Below the neckline, leave opening for each arm: 1 inch on 1 side, 2 inches on the other as you will fill from this spot.
Step 5: Now it is time to stuff the bunny. Add the pillow fill and then hand stitch the opening closed.

Add some personality
Harper still loves to keep little treasures in little purses and pouches so I wanted to add a little place for her! I also simplified the face of the bunny by using fabric paint to add the eyes and nose instead of embroidery thread. I was so happy with how the bunny turned out!
If you loved sewing this DIY Stuffed Bunny, make sure and check out our simple sewing pattern for a DIY Handmade Bunny Purse.

 All photos by Sara Albers for alice & lois design studios. All rights reserved.


Really cute DIY idea for Easter 🙂
Super cute!
Saw this on craft gawker.. way toooo cute! Love the colors you selected.
Thanks Marni!
Love this! I was going to try to do my own pattern for the kids easter basket, this just made my task a lot easier. Thank you!
This is an adorable bunny pattern thanks so much for sharing.
Pauline
These are so cute!
So cute! I WILL BE MAKING A COUPLE OF THOSE FOR MY LITTLE NEICES!
Thanks Shirley. Enjoy!
shared this on http://Facebook.com/dadsews
Look Forward to giving it a shot (and likely failing hahah)
I love this little rabbit but once again Martha makes her patterns very wasteful, why does she have to use 4 pieces of paper and have us fit the parts together in a most ridiculous way?!
thanks I do appreciate a free Pattern but she could have put the whole pattern on 2 pieces of paper.
uN PROYECTO BONITO Y RAPIDO DE HACER.
So cute! I love it and want to try it.
I was wondering if this bunny can be made with 4 way stretch knit with cotton lycra ??
Hi pam – I do not see why the stretch knit would not work. Good luck and happy sewing. =)
Would like pattern for the bunny. Please contact me
use this link from the post https://www.marthastewart.com/907608/stuffed-menswear-bunny
I just made one out of a soft gray print fleece with pink and white striped flannel for the ears and the pocket. I added an oversized poof tail made of gathered pink bridal lace and put a little stuffed felt heart in the pocket. It’s really cute, I do say so myself. I hope the little girl likes it! Thanks for the inspiration!
This sounds absolutely darling!!!!
I made these several years ago. I no longer have the pattern, will you make yours available?
thank you
http://www.marthastewart.com/907608/stuffed-menswear-bunny
Thanks so much for the wonderful instructions and pictures. My 13 yr old daughter is working thru a beginner’s sewing class at our library. She desperately wanted to make some bunnies for a few of her little cousins. This was exactly what we needed – simple, easy, and super cute.
Great!
Great tutorial and such a cute bunny! I researched some Easter Sewing Projects and made a post about my Top Ten Easter Sewing Projects: https://sewingmachines-best.com/easter-sewing-projects/. I hope it’s ok, that I linked your DIY Stuffed Bunny tutorial on my site.
So cute! I don’t understand why step 4 says you’ll sew the ears together with wrong sides facing…
I believe so the seaming is on the inside
Thank you for a great tutorial.
I just need to add faces and embellishments on the pockets.
And I need to add a tail ~ anyone have any great ideas on what/how to do the tail. Pom Pom etc
Thank you,
Di
Hi there! Just wanted to let you know I’ve featured this adorable bunny pattern in my latest roundup of beginner-friendly sewing projects over at Crafts on Display! https://craftsondisplay.com/sewing/free-bunny-patterns-231067/